
Building an LLVM-based tool. Lessons learned
Published on
This article is a text version of my recent EuroLLVM talk called Building an LLVM-based tool: lessons learned.
Intro
For the last three years, I work on a tool for mutation testing: Mull. It is based on LLVM and targets C and C++ primarily. What makes it interesting?
- it works on Linux, macOS, and FreeBSD
- it supports any version of LLVM starting from 3.9
- it is fast because of JIT and parallelization
- packaging and distribution is done in one click
Keep reading if you want to know how it works and how to apply it on your project.
The Build System
llvm-config
The most famous way to connect LLVM as a library is to use llvm-config. The simplest llvm-config-based build system:
> clang -c `llvm-config --cxxflags` foo.cpp -o foo.o
> clang -c `llvm-config --cxxflags` bar.cpp -o bar.o

> clang `llvm-config --ldflags` `llvm-config --libs core support` bar.o foo.o -o foobar.bin
It works quite well in the very beginning, but there are some issues with it.
-
The compiler flags:
llvm-config --cxxflagsgives you the flags the LLVM was compiled with, these are not the flags you necessarily want for your project. Let’s look at the example:-I/opt/llvm/6.0.0/include -Werror=unguarded-availability-new -O3 -DNDEBUG ...The first flag is correct, and you need it. The second one is specific to Clang: it may not work with gcc, and it may not work with an older of Clang itself. The rest (
-O3 -NDEBUG) will force you to compile your project in the release mode. It’s fine, but not always desirable. -
The linker flags.
llvm-config --ldflagsdoes the right job. It tells where to look for the libraries and tweaks some other linker settings.llvm-config --libs <components>also does the right job. It prints the set of libraries you need to link against to use the specified components (you can see the whole list of components viallvm-config --components). However, there is a weird edge case. If, on your system, you have installed several versions of LLVM, and they come with a dynamic library, e.g.:/usr/lib/llvm-4.0/lib/libLLVM.dylib /usr/lib/llvm-6.0/lib/libLLVM.dylibThen, you may get a runtime error after successful linking:
> clang foo.o bar.o -lLLVMSupport -o foobar.bin
> ./foobar.bin
LLVM ERROR: inconsistency in registered CommandLine options
To prevent this from happening, you should instead link against the dynamic library:
> clang foo.o bar.o -lLLVM -o foobar.bin
> ./foobar.bin
Yay! We are good to go now!
To handle this case properly, you need to check the presence of the libLLVM.dylib on your system somehow. Alternatively, use CMake (see the next part).
-
The linking order. As I said,
llvm-config --libsdoes the right job, but it only applies to the LLVM libraries. If you also want to use Clang libraries with llvm-config, then you are in trouble: the libraries should be placed in the right order. It may work, or may not. The problem arises only on Linux. Either you manually re-order the Clang libraries until it compiles, or you wrap the libraries list into the--start-group/--end-group. That’s a reasonable solution, but it does not work on macOS. Before migrating to CMake we ended up with something like this:if macOS LDFLAGS=-lLLVM -lclangEdit else LDFLAGS=-Wl,--start-group -lLLVM -lclangEdit -Wl,--end-group endif clang foo.o bar.o $LDFLAGS -o foobar.bin
Quite frankly, llvm-config is rather a suboptimal solution for the long run…
CMake
LLVM itself uses CMake as its primary build system. LLVM engineers put an enormous amount of work into making it very friendly to the LLVM users.
Note: I assume that you understand CMake, otherwise I suggest you build the mental model through this short article: Bottom-up CMake introduction.
Adding LLVM and Clang as a dependency through CMake is reasonably straightforward:
find_package(LLVM REQUIRED CONFIG
             PATHS ${search_paths}
             NO_DEFAULT_PATH)
find_package(Clang REQUIRED CONFIG
             PATHS ${search_paths}
             NO_DEFAULT_PATH)
Please, note the ${search_paths} and the NO_DEFAULT_PATH.
This is the ${search_paths} in our case:
set (search_paths
  ${PATH_TO_LLVM}
  ${PATH_TO_LLVM}/lib/cmake
  ${PATH_TO_LLVM}/lib/cmake/llvm
  ${PATH_TO_LLVM}/lib/cmake/clang
  ${PATH_TO_LLVM}/share/clang/cmake/
  ${PATH_TO_LLVM}/share/llvm/cmake/
)
The PATH_TO_LLVM is provided to CMake externally by the user.
Bold statement: You should not rely on the ‘use whatever is installed on the machine,’ but explicitly provide the path to the LLVM installation.
Bold statement: For development, you should not use LLVM/Clang provided by your Linux distro, but instead, install it manually using official precompiled binaries.
You can ignore the above statements if you only use LLVM libraries. If you also need Clang libraries, then you may get into trouble. On Ubuntu, some versions of Clang were coming with a broken CMake support:
CMake Error at /usr/share/llvm-6.0/cmake/ClangConfig.cmake:18 (include):
  include could not find load file:

    /usr/lib/cmake/clang/ClangTargets.cmake
Call Stack (most recent call first):
  CMakeLists.txt:8 (find_package)
Search on the Internets for “CMake cannot find ClangConfig” to see how many projects and users suffered from this.
Once the find_package succeeds, you get LLVM_INCLUDE_DIRS variable and bunch of LLVM targets you can use:
target_include_directories(mull PUBLIC ${LLVM_INCLUDE_DIRS})
target_link_libraries(mull LLVMSupport clangTooling)
Except there is the
LLVM ERROR: inconsistency in registered CommandLine options
runtime error. To handle it with CMake, consider using the following snippet:
if (LLVM IN_LIST LLVM_AVAILABLE_LIBS)
  target_link_libraries(mull LLVM clangTooling)
else()
  target_link_libraries(mull LLVMSupport clangTooling)
endif()
That should do the trick.
Supporting multiple LLVM versions
There are at least two ways to support several versions of LLVM.
You can add a bunch of #ifdefs to the source code. This is how Klee does it, and it works for them pretty well (seems like).
Example #1:
#if LLVM_VERSION_CODE >= LLVM_VERSION(4, 0)
#include <llvm/Bitcode/BitcodeReader.h>
#else
#include <llvm/Bitcode/ReaderWriter.h>
#endif
Example #2:
#if LLVM_VERSION_CODE >= LLVM_VERSION(5, 0)
  assert(ii->getNumOperands() == 3 && "wrong number of arguments");
#else
  assert(ii->getNumOperands() == 2 && "wrong number of arguments");
#endif
The other way, the one Mull uses, is to provide a façade library. Mull has several libraries with the same interface, but with slightly different implementations. They are simply pairs of a header and .cpp file:
> tree LLVMCompatibility/
LLVMCompatibility/
├── 3.9.x
│   ├── CMakeLists.txt
│   ├── LLVMCompatibility.cpp
│   └── LLVMCompatibility.h
├── 4.x.x
│   ├── CMakeLists.txt
│   ├── LLVMCompatibility.cpp
│   └── LLVMCompatibility.h
...
├── 8.x.x
│   ├── CMakeLists.txt
│   ├── LLVMCompatibility.cpp
│   └── LLVMCompatibility.h
Then, we can use CMake to decide which version to use:
set (llvm_patch_version "${LLVM_VERSION_MAJOR}.${LLVM_VERSION_MINOR}.${LLVM_VERSION_PATCH}")
set (llvm_minor_version "${LLVM_VERSION_MAJOR}.${LLVM_VERSION_MINOR}.x")
set (llvm_major_version "${LLVM_VERSION_MAJOR}.x.x")

set (full_llvm_version ${llvm_patch_version})

if (EXISTS ${CMAKE_CURRENT_LIST_DIR}/LLVMCompatibility/${llvm_patch_version})
  set (LLVM_COMPATIBILITY_DIR ${llvm_patch_version})

elseif(EXISTS ${CMAKE_CURRENT_LIST_DIR}/LLVMCompatibility/${llvm_minor_version})
  set (LLVM_COMPATIBILITY_DIR ${llvm_minor_version})

elseif(EXISTS ${CMAKE_CURRENT_LIST_DIR}/LLVMCompatibility/${llvm_major_version})
  set (LLVM_COMPATIBILITY_DIR ${llvm_major_version})

else()
  message(FATAL_ERROR "LLVM-${full_llvm_version} is not supported")
endif()

add_subdirectory(LLVMCompatibility/${LLVM_COMPATIBILITY_DIR})
What happens here: CMake is looking for a directory with the compatibility layer for the given LLVM version in a special order. For example, for the version 8.0.1 it will do the following:
- Use
LLVMCompatibility/8.0.1if it exists - Use
LLVMCompatibility/8.0.xif it exists - Use
LLVMCompatibility/8.x.xif it exists - Give up and fail
As soon as it finds the right folder, it will include it in the build process. So far we used only <number>.x.x, but the idea is that we can provide a particular library for any version of LLVM if we need to.
Here is how two header files look like:
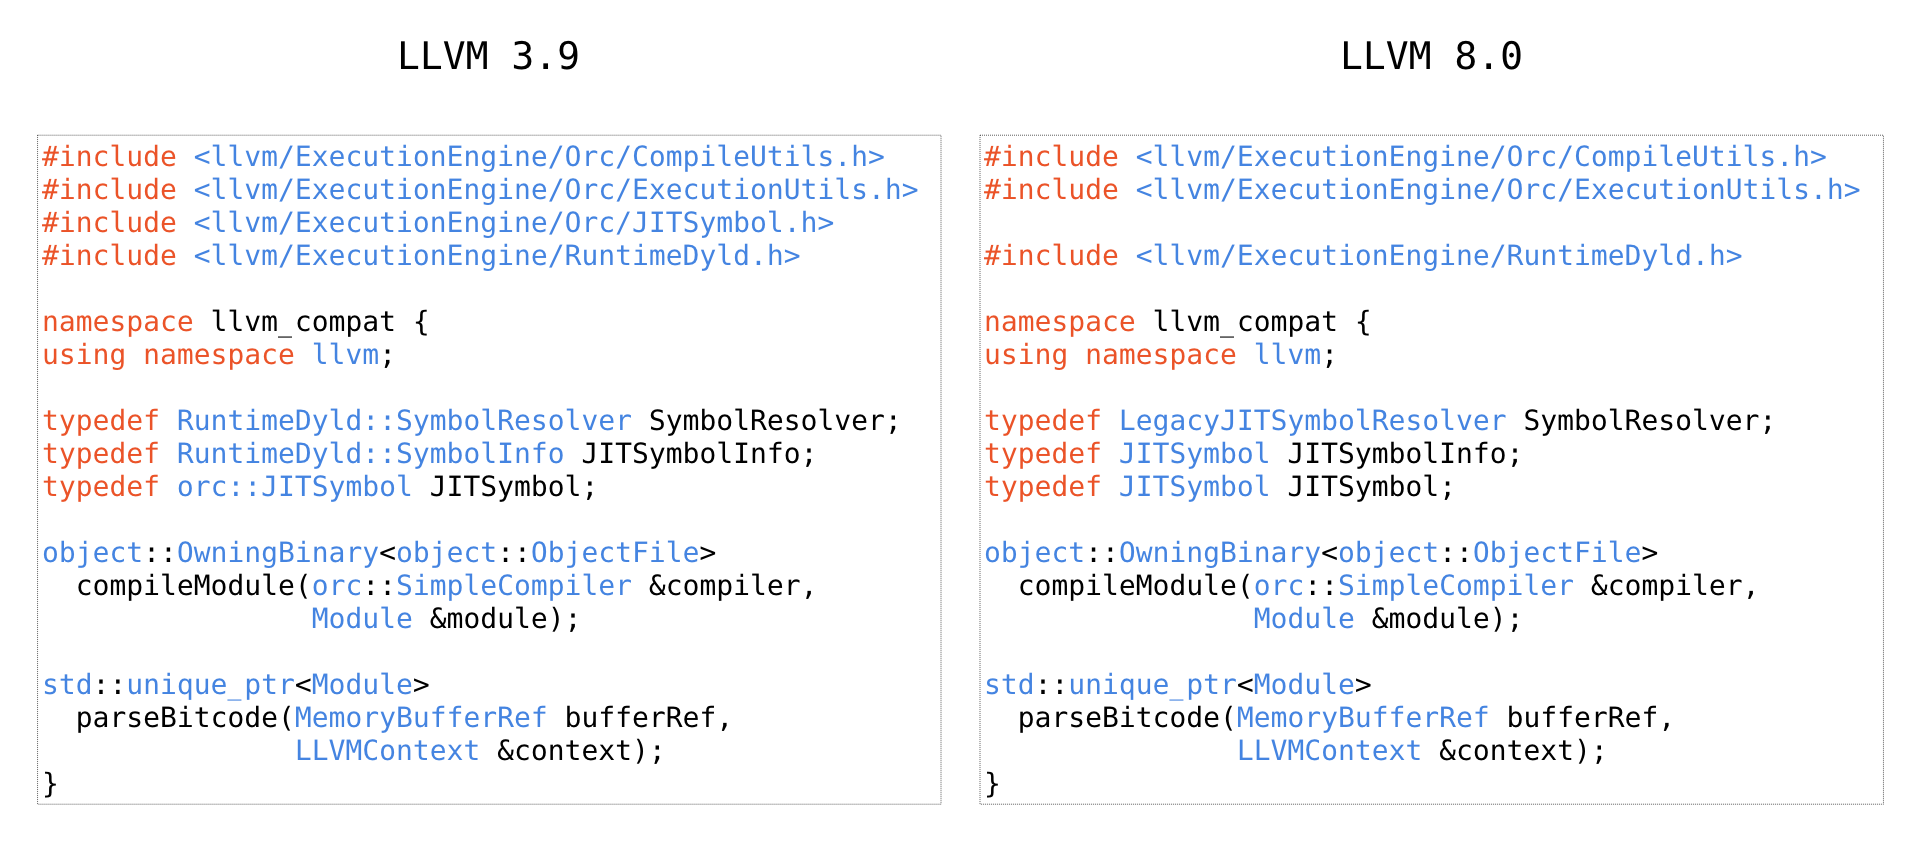
Then, in the source code we simply use the compatibility layer instead of bunch of ifdefs:
auto module = llvm_compat::parseBitcode(buffer.getMemBufferRef(),
                                        context);
Sources VS Binaries
So far I only covered builds against precompiled binary versions of LLVM. However, there are reasons you should also build against the source code. Look at the table:
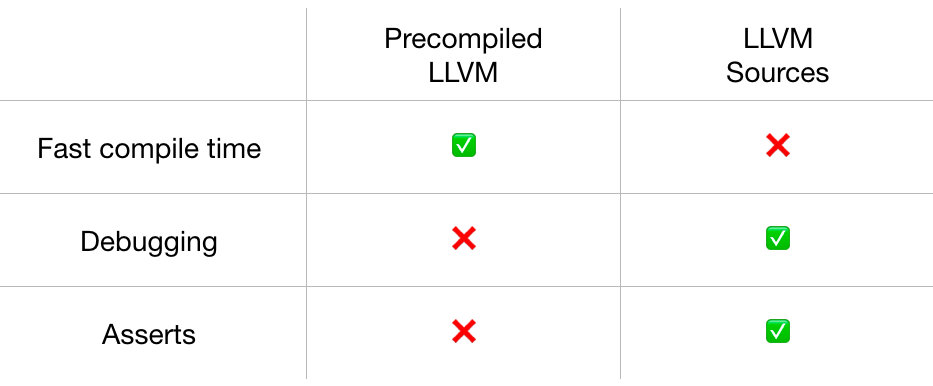
Build time against precompiled versions is much faster, but you give up the ability to debug the LLVM itself which is needed when you hit some bug or some weird behavior. Another significant drawback: asserts. They are disabled in the release builds you get from the http://releases.llvm.org. In fact, we did violate some of the LLVM constraints but didn’t realize it until somebody tried to build Mull against the source code.
You can easily teach CMake to build against source code and against precompiled libraries at the same time.
Here is the trick:
if (EXISTS ${PATH_TO_LLVM}/CMakeLists.txt)
  add_subdirectory(${PATH_TO_LLVM} llvm-build-dir)

  # LLVM_INCLUDE_DIRS ???
  # LLVM_VERSION ???
else()
  ...
endif()
If the PATH_TO_LLVM contains CMakeLists.txt, then we are building against the source code. Otherwise, the behavior is the same as written in the previous paragraphs.
However, LLVM_INCLUDE_DIRS and LLVM_VERSION are not available in this case. We can fix that with these tricks:
get_target_property(LLVM_INCLUDE_DIRS
                    LLVMSupport
                    INCLUDE_DIRECTORIES)
It will fill in the LLVM_INCLUDE_DIRS with the right header search paths.
The LLVM_VERSION is a bit less trivial: we need to parse the CMakeLists.txt:
macro(get_llvm_version_component input component)
  string(REGEX MATCH "${component} ([0-9]+)" match ${input})
  if (NOT match)
    message(FATAL_ERROR "Cannot find LLVM version component '${component}'")
  endif()
  set (${component} ${CMAKE_MATCH_1})
endmacro()

file(READ ${PATH_TO_LLVM}/CMakeLists.txt LLVM_CMAKELISTS)
get_llvm_version_component("${LLVM_CMAKELISTS}" LLVM_VERSION_MAJOR)
get_llvm_version_component("${LLVM_CMAKELISTS}" LLVM_VERSION_MINOR)
get_llvm_version_component("${LLVM_CMAKELISTS}" LLVM_VERSION_PATCH)
set (LLVM_VERSION ${LLVM_VERSION_MAJOR}.${LLVM_VERSION_MINOR}.${LLVM_VERSION_PATCH})
The macro will extract all the information we need from this piece of text (llvm/CMakeLists.txt):
if(NOT DEFINED LLVM_VERSION_MAJOR)
  set(LLVM_VERSION_MAJOR 6)
endif()
if(NOT DEFINED LLVM_VERSION_MINOR)
  set(LLVM_VERSION_MINOR 0)
endif()
if(NOT DEFINED LLVM_VERSION_PATCH)
  set(LLVM_VERSION_PATCH 1)
endif()
That’s it. We are ready to build against LLVM’s source code.
Parallelization
Bold statement: Avoid using LLVM Passes for better parallelization (explanation follows).
Any LLVM-based tool is an excellent example of the fair parallelization: if you have 20 tasks and 4 cores, then you can run 5 tasks per each core and them merge the results. However, LLVM is not very friendly when it comes to the parallelization: lots of classes are not thread-safe.
Let’s consider this picture:
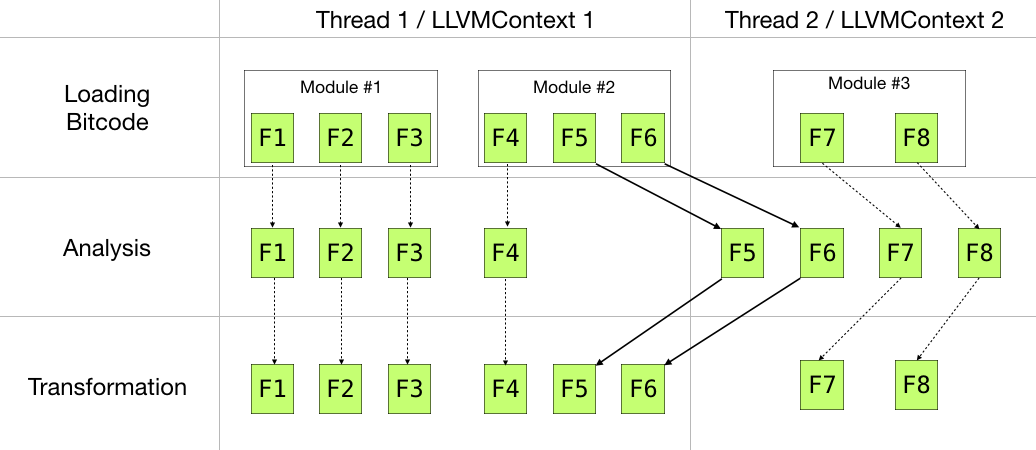
There are three phases: loading, analysis, and transformation:
- We load two modules(#1, #2) within the Thread 1, and the third module (#3) within the Thread 2. What’s important is that each thread should have its own
LLVMContext! - The next phase is the analysis. At this point we only read information from LLVM IR, so we can distribute all the 8 functions (F1-F8) across two threads evenly: Thread 1 analyzes F1-F4, and Thread 2 deals with F5-F8.
- Transformation. Is it essential to ensure that any transformation of a module does not escape the module’s thread boundaries: even such ‘minor’ changes as renaming an instruction is not thread-safe.
Note: of course you can put there lots of locks, but what’s the point of parallelization then?
Now I can tell why you should avoid LLVM Passes: this approach incentivizes you to merge analysis and transformation into one phase, and therefore lose the ability to parallelize efficiently. (There are other issues with LLVM Passes, but it’s a different topic).
Also, LLVM’s PassManagers are not (yet?) parallelization-friendly.
My advice here is to start with separate analysis & transformation phases. It’s easier to implement and easier to test. You can wrap these phases into LLVM pass later if needed.
And of course, you should always measure the performance. Here is one of our measurements:
![]()
You may get the opposite results.
Getting Bitcode
Once per 2-3 months, there is a question on the mailing lists: “How do I compile my program to bitcode?” Clearly, there is a demand for that.
The most common answer I’ve seen is the whole-program-llvm. It’s a great tool, and I can also recommend using it, but keep in mind that it produces one large bitcode file as output. Therefore, you cannot get the benefits of your multicore machine.
There are a few other ways to get the bitcode:
-emit-llvm: passing this flag to the compiler will give you an LLVM Bitcode/IR file as an output. It will break the linking phase of your build system, though.-flto: with this flag all the intermediate object files will, in fact, be LLVM Bitcode files. The program will compile just fine. It won’t work though if you don’t have any intermediate object files in the pipeline (e.g.clang foo.c bar.c -o foobar)-fembed-bitcode: this should be your choice! Clang will compile your program just fine, but it will also include a special section into the binary containing all the Bitcode files (Learn More). You can extract the Bitcode from the binary programmatically using my fork of the awesome LibEBC tool.
Multi-OS Support
For more straightforward support of several operating systems, I highly recommend these two tools: Vagrant and Ansible.
Vagrant allows you to manage virtual machines easily:
config.vm.define "debian" do |cfg|
  cfg.vm.box = "debian/stretch64"
  cfg.vm.provision "ansible" do |ansible|
    ansible.verbose = "v"
    ansible.playbook = "debian-playbook.yaml"
  end
end

config.vm.define "ubuntu" do |cfg|
  cfg.vm.box = "ubuntu/xenial64"
  cfg.vm.provision "ansible" do |ansible|
    ansible.verbose = "v"
    ansible.playbook = "ubuntu-playbook.yaml"
  end
end
With this config you can create a VM ready for use:
vagrant up debian
vagrant up ubuntu
Vagrant also allows you to provision the machine using various providers: from old-school shell scripts to modern tools such as Chef and Ansible.
I prefer Ansible as it is the most straightforward tool, in my opinion. Basically, an Ansible playbook is a shell script on steroids. Here is how a part of it looks like:
packages:
  - fish
  - vim
  - wget
  - git
  - cmake
  - ninja-build
  - libz-dev
  - libsqlite3-dev
  - ncurses-dev
  - libstdc++-6-dev
  - pkg-config
  - libxml2-dev
  - uuid-dev
  - liblzma-dev

tasks:
  - name: Install Required Packages
    apt:
      name: "{{ packages }}"
      state: present
    become: true
This small snippet will make sure that all the packages are installed (present) in the VM.
You can use Ansible to automate lots of things.
In our case, we automate the following processes:
- install packages
- download LLVM
- build & run Mull’s unit tests
- create an OS dependent package (
pkg,deb,rpm,sh) - run integration tests
Another great thing about Ansible: you can run it locally, not necessarily in the VM. We use this feature on CI: executing each mentioned step for every pull request.
It saves me lots of time and simplifies the release process. Here is the whole release script:
mkdir -p packages

function prepare_package () {
  printf "Preparing package for $1... "
  export LLVM_VERSION=$2
  vagrant up $1 --provision 2> ./packages/$1.err.log > ./packages/$1.out.log
  vagrant destroy -f $1 2>> ./packages/$1.err.log >> ./packages/$1.out.log
  printf "Done.\n"
}

prepare_package debian 6.0.0
prepare_package freebsd 8.0.0
prepare_package ubuntu 8.0.0
In the end, I have packages ready in the packages folder for Debian, FreeBSD, and Ubuntu. Doing so for macOS is not as straightforward, but we will get there soon as well.
Summary
Just reiterating all those bold statements one more time:
- don’t use
llvm-configas part of the build system - don’t use LLVM/Clang from your distro for development
- don’t use LLVM passes
- don’t use
whole-program-llvm - use Vagrant & Ansible for multi-OS support
- use different versions of LLVM for development
There is another big topic: Testing, but I will leave it for the next article.